Wednesday, July 31, 2013

I finally tried Home Grown Spaghetti Sauce

shippingcontainerfamily.blogspot.com


Why did I think it was going to be harder than this? Was it years of ready-made spaghetti sauce commercials complaining about how it takes all day for grandma to cook her famous sauce?

And what about flavor? Could I really accomplish something tasty that compared to companies who’ve sold batch upon batch of sauce across the country? (I am not saying they’re good. I am saying they’re successful.)

In the past, I didn’t doubt my abilities...
 Preserve and can food… check. Grow a garden… check. Homeschool my children… got it. Maintain a house made out of a shipping container… no problem. But I didn’t think I was capable of making a good spaghetti sauce? Seriously?

Perhaps it really was the lack of a bumper crop of tomatoes until this year.

This summer, we’ve had more tomatoes than I was really prepared for. My 2013 garden tomato goals were to grow enough so that…

We wouldn’t have to buy any tomatoes for salads all summer.
We wouldn’t have to buy any salsa all summer.
We wouldn’t have to buy any canned, diced, stewed, and/or green-chili-style tomatoes all summer.
We would have PLENTY to give away all summer!

I’d say we’ve attained these goals quite well this season and really for the first time ever as a gardening family. We hit the sweet spot on the right number of tomato plants for our needs right now.

Here’s how I fearlessly made that spaghetti sauce:

I started with…
  • About 25 lbs tomatoes
  • 4-5 sweet or bell peppers
  • 2 gigantic onions
  • About 7 cloves garlic
  • Oil for sautéing
  • One generous handful each of fresh basil and thyme
  • Salt, pepper, and/or sugar or sweetener to taste. (The sweeter AND saltier it is, the more it will resemble store sauce!)

Peel tomatoes easily by cutting a little “X” on the tops of each one and dropping in boiling water for one minute. Transfer tomatoes to a cool bath and remove to cool to the touch. Hold tomatoes firmly by the skins and squeeze so that your tomato slips out of its skin through the “X.”

shippingcontainerfamily.blogspot.com
After a quick bath, these guys just slip out of their skins.

Remove inner juices and seeds by further squeezing tomatoes in your hand until they are drained, or by using a spoon to scoop out the goo.
(I actually cut my “X” pretty deep on each tomato and was able to stick my fingers inside and slide out the goo that way!)

Chop up and start cooking-down tomatoes on a low heat while preparing other ingredients.
Peel and finely chop garlic, dice onion and peppers and sauté in oil until slightly translucent.
Add sautéed vegetables to tomatoes and add salt pepper and/or sugar at this time.
Cook on low, uncovered, for about an hour or maybe even two until tomatoes break down and the liquid reduces just a bit.

Add chopped basil and thyme just before turning off heat. Serve over pasta, chicken, or in a lasagna (this was especially delicious!)

shippingcontainerfamily.blogspot.com

Don’t faint if you are a recipe-follower and not an improvising type of cook. You can find hundreds of grandma-tested sauce recipes (with EXACT measurements) on the internet!!!  This is merely a guideline of how I made mine.

And oh how tasty and truly easy it was. I am glad I stepped out of my comfort zone.


Made homemade spaghetti sauce… check.


shippingcontainerfamily.blogspot.com
Expecting a finished sauce pic? It got eaten. Here's my son doing his favorite thing... rummaging through the cabinets.

Her & Nicole


Friday, July 26, 2013

Daddy's Door

Shipping Container Family


We had to say good bye recently to a special part of our house.

Daddy made the door when he built our first dividing wall. I remember being so excited to finally have a door that can be fully closed.

Shipping Container Family

I LOVED our dutch door.

The top half could be opened independently of the bottom half. With the bottom of the door closed and the top swung open, I could keep toddlers from escaping and still let in a good breeze. I often leaned on the bottom half of the door while chatting with a visitor or checking on the children.

In the summer we found out pretty quickly that open doors mean bugs. Bugs in your kitchen.

So we put up a large piece of mosquito netting to keep the airflow and at least discourage the flying bugs.

Shipping Container Family

But with the installation of electricity came the decision to air condition our home. And our beautiful dutch door was NOT going to keep cool air in and hot muggy air out.

Not just that – but our new location had so many more species of insects. SO many bugs.

So we grabbed a storm door on craigslist and made the swap.

Shipping Container Family

It actually modernized the look of our home. We went from Little House to Southern Porch in an afternoon. And YES, we kept the door for a future project.

Shipping Container Family

Growing up, my mom had the front door open every day. All day. Rain or shine. The glass storm door was always there - just to keep the bugs out and the air conditioning in - but it wasn’t unusual to hear that door open and spring shut fifty times a day. It somehow extended our home’s square footage to include the entire front yard.


Over the past few years as I greatly encourage the children to spend most of their day outside, I see where our door is serving that same purpose. It’s not a barrier to the outside world, locking us in and blocking the outdoors. It’s a diving board for today’s next adventure. And thankfully, a much needed expansion to our small home.

Thursday, July 18, 2013

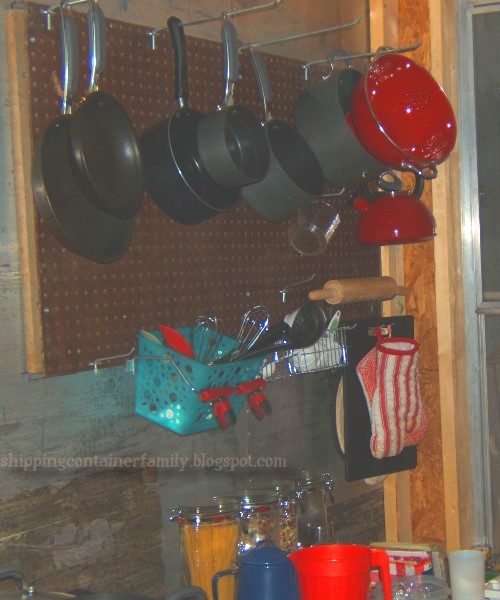
Pegboard in the kitchen


Pegboard in the kitchen!


Yes, we put pegboard in the kitchen!

Living in a small (TINY!) home, it is essential to be open-minded and creative with our storage.

Pegboard in the kitchen!
Painted to brighten up our space. Mounted above the drainboard for easy drip-drying after dishes.

There are a million creative ways to hang pots and pans in a kitchen. Old ladders, magnets, baskets, etc… 

 Just ask Pinterest.

As I have mentioned before, our walls are tall, and when we look for more storage space, we typically look UP.

So naturally, we've been hanging pots on the wall handyman-style for years now.

Pegboard in the kitchen!
This is what it looked like when we first put it up (about six years ago).

Funny how it’s usually a big part of everyone’s visiting experience. When someone comes over the first time, they usually say, “Oh look!” at our pegboard pots and pans!

Pegboard can be customized easily to fit any space, and the pegs can be re-arranged in any way to suit your storage needs. There are so many choices aside from peg hooks. Baskets, jars, clips, and shelving just to name a few!

Pegboard in the kitchen!
Personalize it.

And it’s one of the easiest small home storage solutions we've implemented so far! 


Friday, July 12, 2013

Homemade Garden Salsa


There is nothing like a home grown tomato. For summer suppers, we usually eat them sliced as a side dish with a little salt and pepper. They come in from our garden, fresh-picked by a preschooler, still hot from the summer sun and slice up juicy, thick, dripping with tomato seed goo.

And yet as delicious as they are, this year has been bountiful (Thank you Lord!) and it is time to make salsa or they will all ROT! It is difficult to find a recipe that knows that the tomatoes are booming and the peppers are still slow, and we have run out of all but the egg-sized garden onions. I had to adjust a few recipes I came across in order to make garden-grown salsa based on what we had.

A few batches later and I had learned a whole lot about salsa. I also found out that it is sometimes difficult to get a really hot, firey (oh yeah) salsa, because peppers can be unpredictable.


But here’s what the processing of most of our batches looked like, with a few tweaks along the way.


Garden Salsa
Base Recipe:

4 quarts tomatoes, peeled, diced or blended, (drained in colander if too juicy)
1 cup chilies or any variety sweet peppers, diced
3 cups onions, diced
1-1/2 cups jalapenos, diced
3 cloves garlic, chopped finely
1 cup lemon juice or apple cider vinegar
1 teaspoon salt
2 teaspoons cumin
1 tightly-packed cup chopped fresh cilantro
Combine all but last two ingredients in large pot. Bring to a boil and cook on medium heat for 5-10 minutes before adding cilantro and cumin. Stir and simmer 5 minutes more. If very watery after cooking and a thicker consistency is needed, add 1-2 6oz. cans tomato paste. Process using a recommended canning timetable, freeze, or eat fresh.
(Makes about 12 pints)

First, I took our bucket of tomatoes and gave each one a boiling water bath for about a minute.

From there they were dunked in a cool water bath and stacked on the drain board to await their scalping. 

This loosens the skins and they then peel off very easily.

My girls did the peeling. They love gory kitchen activities like this.


We had a little fun too… as usual.


Next those were popped in the fridge. As it turns out, that is where they would remain until I got my hands on another good stretch of time. I could have done an efficient finishing of this salsa project later that evening, but I promised the girls they would be able to help me make it, so it waited.


Then I chopped the jalapenos and chilies, and had to pack them into a container for safe keeping in the fridge until the next day. (I can highly recommend doing this step days in advance of a predicted tomato crop. If you can have everything ready for the pot, your salsa can be thrown together in a quick afternoon of tomato processing.)

Chop the tomatoes for a chunky salsa or send them through the blender or food processor if you like a smooth restaurant style batch.

Put everything in the stock pot and simmer 5-10 minutes before adding fresh chopped cilantro and cumin.


For fresh eating, stop here.


For canning, check your acidity, warm up your jars, lids, and water bath, and see an official canning times chart for times. (I won’t go into a canning tutorial or a big food safety speech, but use your brain and don’t poison your family!)
Try THIS LINK for more safety tips and recipes.

I canned each batch using our pressure canner for the water bath job. We ate what didn’t seal and stored (and shared) the rest. It’s not going to last us long…


Note to self: Next year more salsa!

Wednesday, July 10, 2013

Dear Homesteading Lady


Someone who is enthusiastic about homesteading is always fun to talk to. You can talk chickens, gardening, goats, housing (conventional and UN-conventional), herbal remedies, guns, etc. Usually you can name a subject and swap ideas, stories, and problems for a long time.

Then occasionally, you run into a real veteran homesteader. Someone who really knows a wealth of knowledge based on personal experience.


And then, you might just … want to have a two-sided conversation.


Dear Homesteading Lady: You are not the only homesteader on the planet.


Recently I was talking to a person who had lived an idealistic, romantic, simple life on the homestead for years before it was popular. She has homeschooled all her children and baked her own bread and cooked on a woodstove. She was incredibly sweet.

In our conversation, I listened and listened. I had to break away for moments at a time to tend to my children, but I jumped back in and responded to the stories with comments like, “oh, believe me, we know about outhouses!” or “We have those in our garden this year too.” or “That’s what we did for our youngest.” 

With a smile, she continued to tell stories and freely hand out advice.

And as the conversations went on, I began to be very frustrated with this woman. I couldn’t pin down why. Later that evening I realized I knew all about her “homestead life” now and she didn’t even know I had just spent the last 6 years as a homesteader too!


Dear Homesteading Lady: It’s not you, it’s me.


I had ALSO baked my own bread and used herbal remedies and foraged for wild food! I had lived without grid power and city water and I had used the wood stove to heat and cook and I had been kicked in the gut by an 800lb milker and I wanted desperately to tell her we were one in the same! And I still couldn’t believe it- had I really left her with the impression she had talked to a city girl? A greenhorn only interested in hearing about labeling mason jars with chalkboard paint?

I felt like I had earned at least a couple of sentences about what we had done. My responses were actually even polite ways of sneakily interjecting knowledge about our family. Hints that we are alike! But it fell on deaf ears, and left me worn out from the conversation.


Dear Homesteading Lady: I hope we meet again. I have a lot left to say.